Django Performance Improvements - Part 3: Frontend Optimizations
Django Performance Improvements - Part 3: Frontend Optimizations
In the last 2 parts of this series around improving performance in your Django applications, we focused on database and code optimizations. In part 3, we will focus on ways to improve the frontend speed of our Django applications by using the following:
Minification
Put Javascript Files at the bottom of the Page
Http performance
Caching
CDN systems
Measuring Performance speed
The first step in any site optimization process is to get a benchmark of the speed of your Django website. Google page insights is the right tool to measure website performance as it reveals a website's health by providing insights on how the website performs on mobile and desktop devices, and will give you a performance score based on the following metrics.
First Contentful Paint
Time to Interactive
Speed Index
Total Blocking Time
Largest Contentful Paint
Cumulative Layout Shift
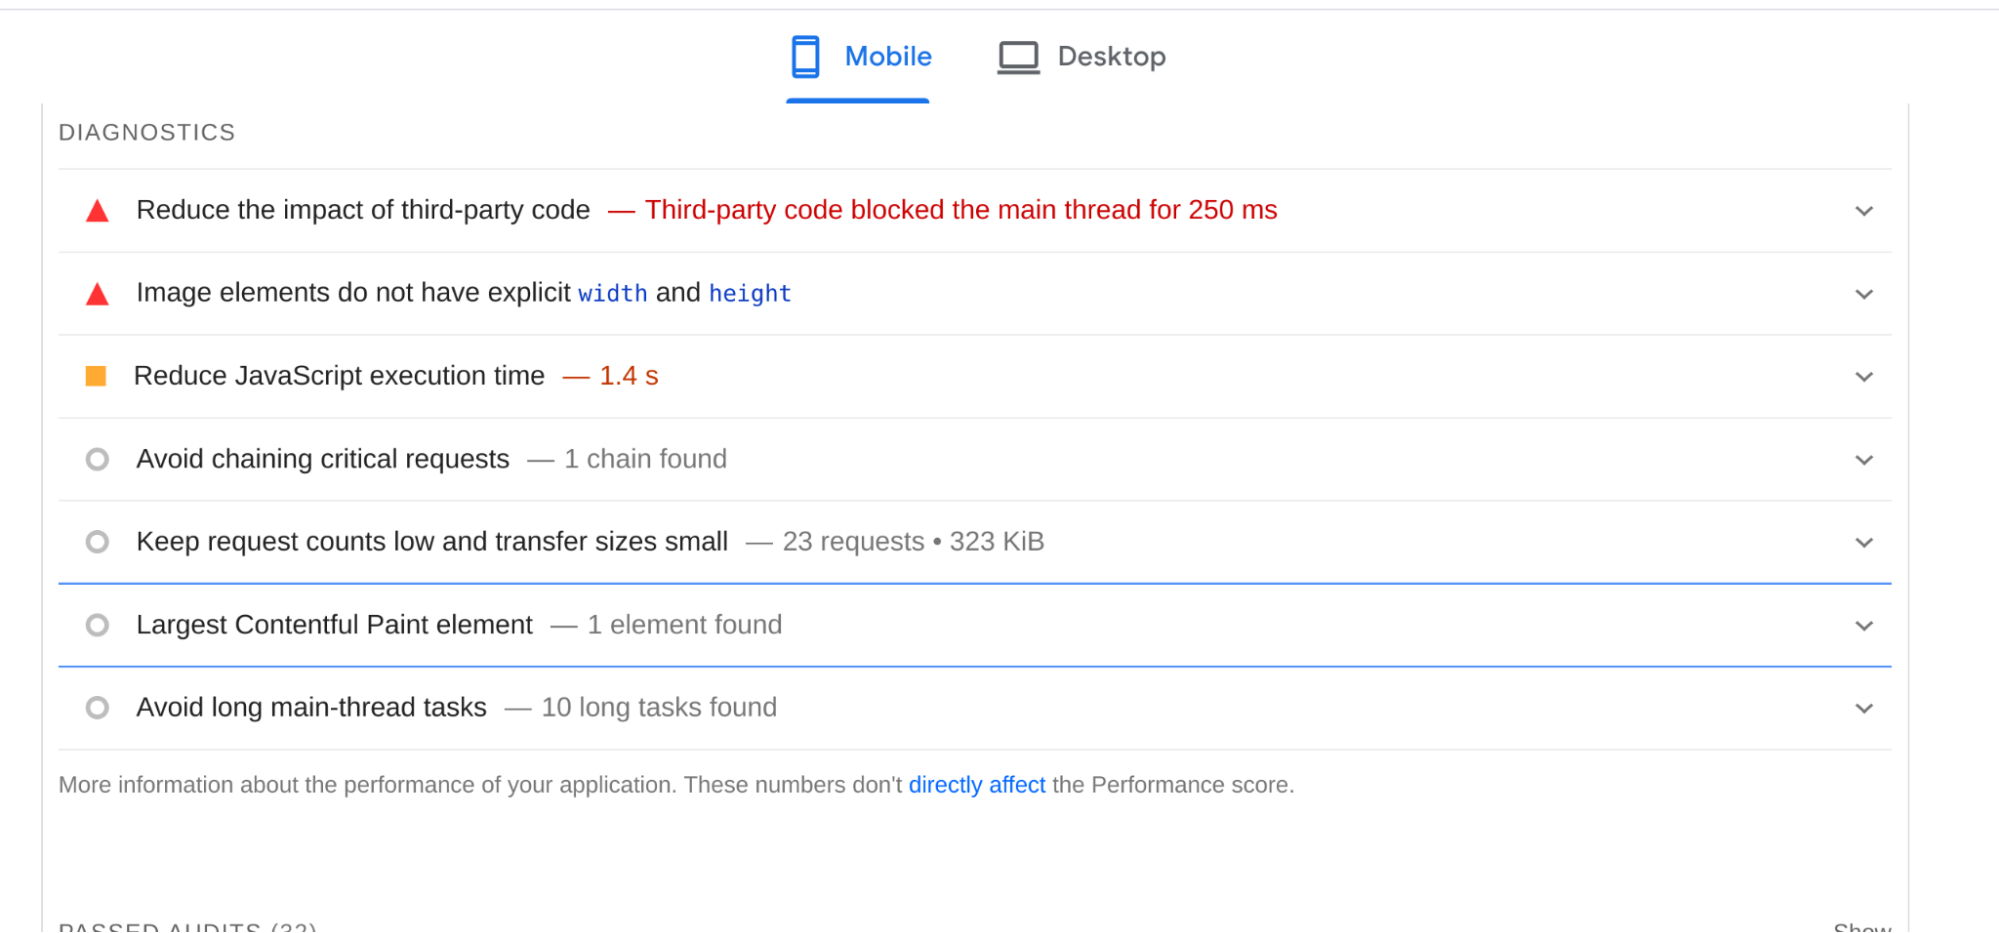
Google page insights also gives you recommendations for making your website faster. For example, the image below shows the diagnostics of a site running on Django and how to improve it.
Once you have this data, you can optimize your website for speed using the methods discussed below.
Minification
Static files in Django include CSS, javascript files, and images. These files are stored in the static folder in your Django application. Your Django application knows how to search for them by having the following configurations in settings.py
STATIC_URL = 'static/'
STATIC_ROOT = os.path.join(BASE_DIR, 'static')
STATICFILES_DIRS = [
os.path.join(BASE_DIR, "templates/static"),
]If the static files are too large, your Django application will take considerably more time to load. And this will be frustrating to your customers.
Minification compresses static files by removing unnecessary space, comments, and long variable names, & ensures that pages take less space and load as fast as possible.
How minification works
Consider the following CSS file mystyle.css
body {
  background-color: lightblue;
}

h1 {
  color: navy;
  margin-left: 20px;
}
Once the above file is minified, it looks like this:
body{background-color:#add8e6}h1{color:navy;margin-left:20px}The original file takes 7 lines and contains additional white space, while the minified version takes only 2 lines.
Minification of Javascript files also works the same as CSS files. For example, consider the following code from Django documentation which obtains a token in an AJAX POST request,
function getCookie(name) {
    let cookieValue = null;
    if (document.cookie && document.cookie !== '') {
        const cookies = document.cookie.split(';');
        for (let i = 0; i < cookies.length; i++) {
            const cookie = cookies[i].trim();
            // Does this cookie string begin with the name we want?
            if (cookie.substring(0, name.length + 1) === (name + '=')) {
                cookieValue = decodeURIComponent(cookie.substring(name.length + 1));
                break;
            }
        }
    }
    return cookieValue;
}
const csrftoken = getCookie('csrftoken');
Once minified, it looks like this:
function getCookie(a){let c=null;if(document.cookie&&""!==document.cookie){let d=document.cookie.split(";");for(let b=0;b<d.length;b++){let e=d[b].trim();if(e.substring(0,a.length+1)===a+"="){c=decodeURIComponent(e.substring(a.length+1));break}}}return c}const csrftoken=getCookie("csrftoken")Django Compressor
Django Compressor is used to minify CSS and Javascript files in Django templates. It works by combining and minifying the files into a single cached file.
To use the Django compressor, the first step is to install it via pip.
pip install django_compressorOnce installed, add it to the list of installed apps in settings.py
INSTALLED_APPS = [
    compressor,
]
Django compressor dependencies
Next, add the Django compressor's configurations in the settings.py file.
Add static STATICFILES_FINDERS as shown below:
STATICFILES_FINDERS = (
    'django.contrib.staticfiles.finders.FileSystemFinder',
    'django.contrib.staticfiles.finders.AppDirectoriesFinder',
    'pipeline.finders.PipelineFinder',
)
Set COMPRESS_ENABLED to True
COMPRESS_ENABLED = TrueLastly, add the load compress tag in the template files, which needs to be compressed. For example, to compress CSS files:
{% load compress %}
{% compress css %}
<link rel="stylesheet" href="/static/css/main.css" type="text/css" charset="utf-8">
{% endcompress %}
For JavaScript files, use the compress js tag like this:
{% load compress %}
{% compress js  %}

{% endcompress %}
django-compressor will compress all the CSS and JS files after running the python manage.py compress command and store them in a cached file. The compressor will also change the template file to reference the cached file which will now look like this:
Put JavaScript files at the bottom of the page
Another way to increase page performance is to place JavaScript scripts at the bottom of the page. The content will load first, especially on slow connections, and users won't have to wait.
Image Optimization
Large images on your site consume lots of bandwidth & increase load time. Image optimization involves making images an optimal size and dimensions without affecting the image quality so they load faster, and thus, make your Django application faster.
Sometimes you have no control over images' size and dimensions submitted by users, primarily if your application supports image uploads; these images need to be optimized. An excellent way to compress images is by using the Pillow library. Pillow can convert images to the same format and compress them adequately before being saved in your application.
Here is how to perform image compression using the Pillow library before an image is saved.
from django.db import models
from PIL import Image
from io import BytesIO
from django.core.files import File

# Create your models here.

def compress_image(image):
    img = Image.open(image)
    if img.mode != "RGB":
        img = img.convert("RGB")
    img_output = BytesIO()
    img.save(img_output, 'JPEG', quality=80)
    compressed_image = File(img_output, name=image.name)
    return compressed_image

class Person(models.Model):
    email = models.EmailField()
    name = models.CharField(max_length= 100, blank=False, null=False)
    image = models.ImageField(upload_to= 'files/',null=True)

    def save(self, *args, **kwargs):
            self.image = compress_image(self.image)
            super().save(*args, **kwargs)
Avoid multiple page redirects
Page redirects is a process where the page requested is redirected to another resource for loading; instead of the page performing a request to a single page, it performs multiple requests. Page redirects result in additional time to load a page, hence sluggish sites.
Compress content
Django provides the Django Gzip middleware, which you can use to compress content and make it smaller. To enable this middleware in your Django application, add it to the list of middleware in settings.py as shown below
MIDDLEWARE = [
“django.middleware.gzip.GZipMiddleware “

]
Gzip middleware should be used with caution because it is susceptible to attacks.
Caching
Cached files are served from a cache, which means that when a user submits a request, it first checks in the cache, and if the page is present in the cache, it is served from the cache. If the requested page is not in the cache, it is first fetched, cached for future use, and served to the user.
Django's default caching backend is LocMemCache and is set up by adding it as a backend in the settings.py file.
CACHES = {
    'default': {
        'BACKEND': 'django.core.cache.backends.locmem.LocMemCache',
        'LOCATION': 'unique-snowflake',
    }
}
LocMemCache is, however, unsuitable for production because it's not memory efficient.
Views Caching
Django supports caching in views. Suppose you have a view that serves a url that doesn't change often; it makes sense to cache it to avoid retrieving the page for every user who requests the page. Caching in Django views is done by applying the @cache_page decorator on the view, as shown below.
from django.views.decorators.cache import cache_page

@cache_page(60*60*24)
def index_view(request):
    ...
60x60x24 means the view will be cached for 24 hours.
The URL for the home_view above looks like this:
urlpatterns = [
    path('app/index', index_view),
]
When the URL /app/index/ is requested, it will be cached, and subsequent requests will use the cache.
Template caching
Template caching is another way of improving page speeds.
Template caching is possible for content that changes often. Django provides fragment caching, ensuring that only certain parts of a template are cached and the rest of the dynamic content is left uncached. To add this setting to your Django project, you need to put the cache tag at the top of your template and specify the content block you wish to cache as follows:
{% load cache%}

{% cache header %}
<title class = "title">{{object.title}}</title>

{% end cache%}
This setting above will create a cache fragment with the name "header" and cache it forever. If you only need to cache the template for a certain period, specify the cache timeout in seconds as shown below:
{% load cache %}

{% cache 500 header %}
<!-- …….
Header content here -->
{% end cache%}
Serve Static files using CDN(Content Delivery Network) services
CDN services are an excellent way to increase the page load speeds of your Django application. CDN (Content delivery network ) is a set of servers spread across different locations to serve content and ensure a quick delivery. For example, suppose your Django application is hosted by a server in the USA, and users are located worldwide.
With a CDN, the client in China will be connected to the CDN server closest to their geographical location and one which offers the least latency. CDN systems perform well by using a load balancer, ensuring that client requests are forwarded to the closest CDN servers, providing maximum efficiency. A CDN works by having cached copies of the static files in different CDN locations, making it faster for users to access the content.
As shown in the "Minification" section above, Django stores your static files in one folder specified by the STATIC_ROOT setting."
When you deploy your Django application, having your static files in the same server as your Django application is not optimal performance-wise. With a CDN, it does not need to fetch them from far away but from a nearby location hence faster responses. Some of the most popular CDN services you can use in your Django application include Akamai, Amazon CloudFront, Cloudflare, Fastly, and Google Cloud CDN, among others.
Django has the django-storages package, which can store and server static files from a CDN server. Django storages supports popular backends such as Amazon S3, Google Cloud, Digital ocean, and more.
The first step is to install django-storages via pip.
pip install django-storagesNext, add storages to the list of installed apps in settings.py:
INSTALLED_APPS = [
    ...
    'storages',
    ...
]
If you decide to use Amazon S3, you will need to create an account. Amazon S3 offers file storage, and data is stored in buckets.
To upload your static files to an S3 bucket, add the following in your settings.py:
STATICFILES_STORAGE = 'storages.backends.s3boto3.S3StaticStorage'To use Amazon S3 and its cloud front service as a CDN, create a bucket on AWS S3 and set the AWS credentials in your Django project in settings.py like so:
AWS_ACCESS_KEY_ID = 'your-access-key'
AWS_SECRET_ACCESS_KEY = 'your-secret-key'

AWS_S3_CUSTOM_DOMAIN = 'cdn.mydomain.com'
AWS_S3_SECURE_URLS = True

AWS_STORAGE_BUCKET_NAME = 'bucket_name'
AWS_IS_GZIPPED = True
Lastly, set the STATIC URL to serve static files from the CDN custom domain.
STATIC_URL = 'https://cdn.mydomain.com'Frontend Monitoring in Django applications
Many factors contribute to the overall performance of your Django application, such as database, middleware, and views. Sentry's code-level application performance monitoring allows you to spot slow-performing HTTP operations and the time taken by every page transaction.
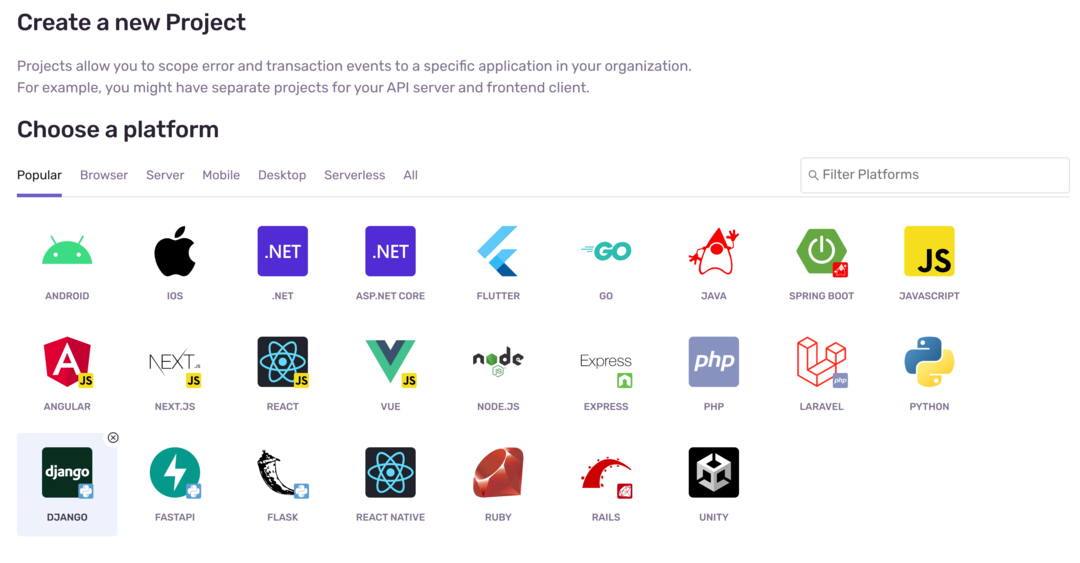
To follow along, set up your Sentry account and create a Django project as shown below:
The next step is to install Sentry’s SDK via pip:
pip install --upgrade sentry-sdkNext, open settings.py and add the Sentry SDK as shown below
import sentry_sdk
from sentry_sdk.integrations.django import DjangoIntegration

sentry_sdk.init(
    dsn="https://examplePublicKey@o0.ingest.sentry.io/0",

    integrations=[DjangoIntegration()],

    # Set traces_sample_rate to 1.0 to capture 100%
    # of transactions for performance monitoring.
    # We recommend adjusting this value in production.
    traces_sample_rate=1.0,

    # If you wish to associate users to errors (assuming you are using
    # django.contrib.auth) you may enable sending PII data.
    send_default_pii=True
)
Setting the traces_sample rate
Navigate to the Sentry dashboard (Performance > Frontend) and "Frontend":
Navigate to the bottom to view transaction metrics. You should see something like this:
From the data above, TPM shows the average number of transactions per minute. Other metrics include:
p50: 50% of transactions are above the time set on the p50 threshold. For example, if the P50 threshold is set to 10 milliseconds, then 50% of transactions exceeded that threshold, taking longer than 10 milliseconds.
p75: 25% of transactions are above the time set on the p75 threshold
p95: 5% of transactions are above the time set on the p95 threshold
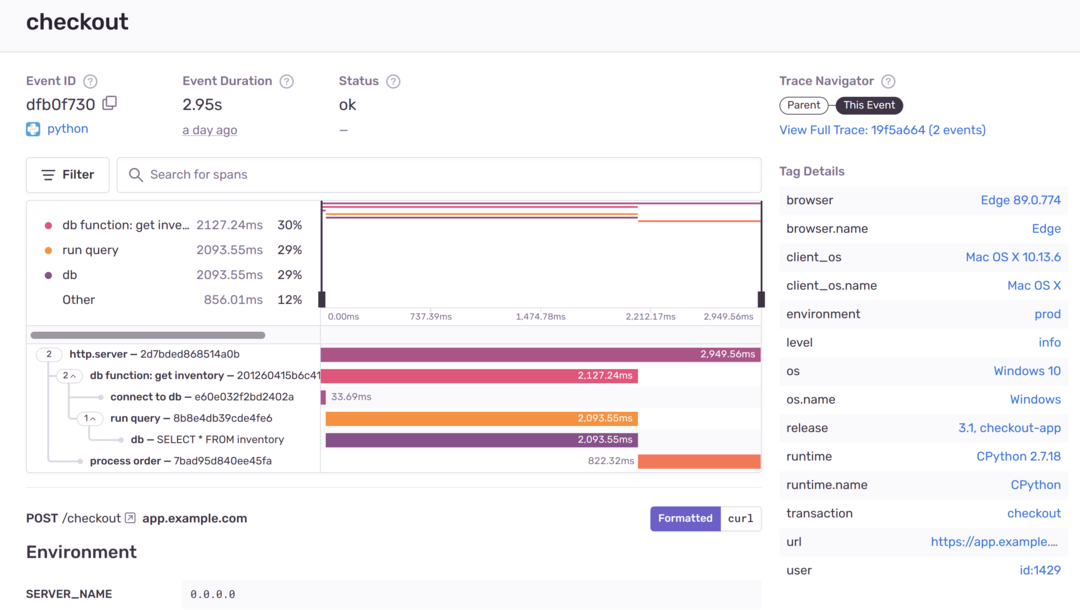
When you expand each transaction, you have more details about how each part of a request affects the overall response time:
The diagram above gives an overview of how each request performs and what causes it to be slow, allowing you to fix it quickly. From the configurations, we set a trace parameter (traces_sample_rate=1.0) which sends every transaction to Sentry (you should choose a sample rate that you're comfortable with - Sentry's docs provide details on how to decide); this enables you to gain insights into what part of your Django application is negatively impacting its overall performance.
Conclusion
This tutorial has covered frontend optimizations you can consider for speeding up your Django application. We'll wrap this series up in part 4 where we'll focus on caching optimizations.


