How to handle Android exceptions and avoid application crashes


Ruben Quadros - Last Updated:

Let’s start by stating the obvious: An exception is a problem that occurs during the runtime of a program and disrupts its conventional flow. Exception handling is the process of responding to an exception.
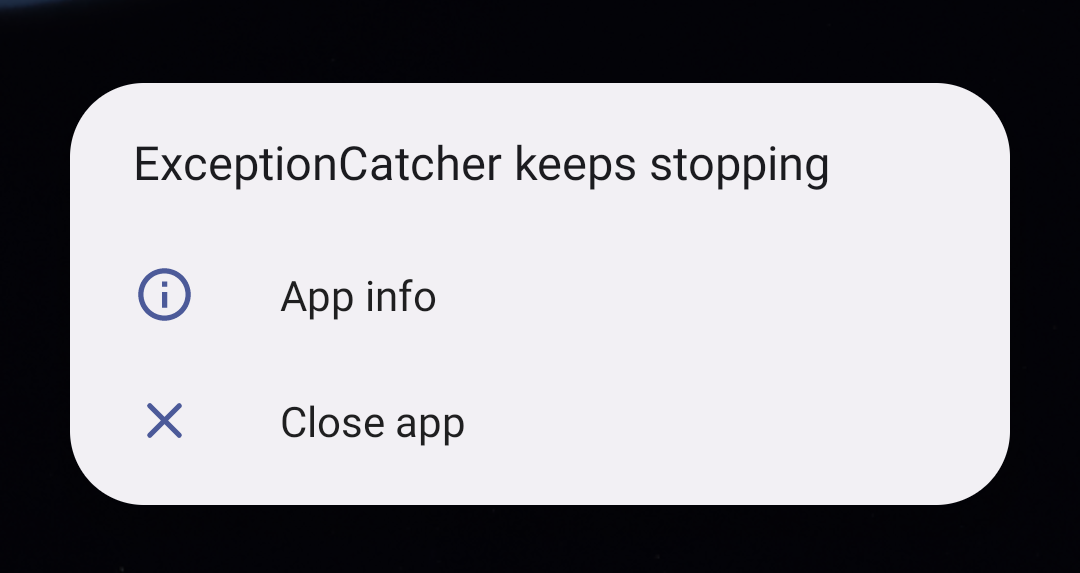
In Android, not handling an exception leads to your application crashing and you seeing the dreaded “App keeps stopping” dialog. This makes handling exceptions incredibly important, and let’s face it: No one is going to use an app that continually crashes.
Modern Android development has evolved significantly in how we handle and monitor exceptions. Beyond traditional try/catch blocks, we now have automatic ANR (“Application Not Responding”) detection, Session Replay for debugging, and sophisticated monitoring tools that provide deep insight into production issues.
In this article, we’ll look at different ways to handle exceptions and ANRs, how to leverage modern debugging tools like Session Replay to understand the user behavior leading to crashes, and how to use Sentry to track your app’s stability over time. Since we are focusing on Android, all the examples will be in Kotlin using Jetpack Compose.
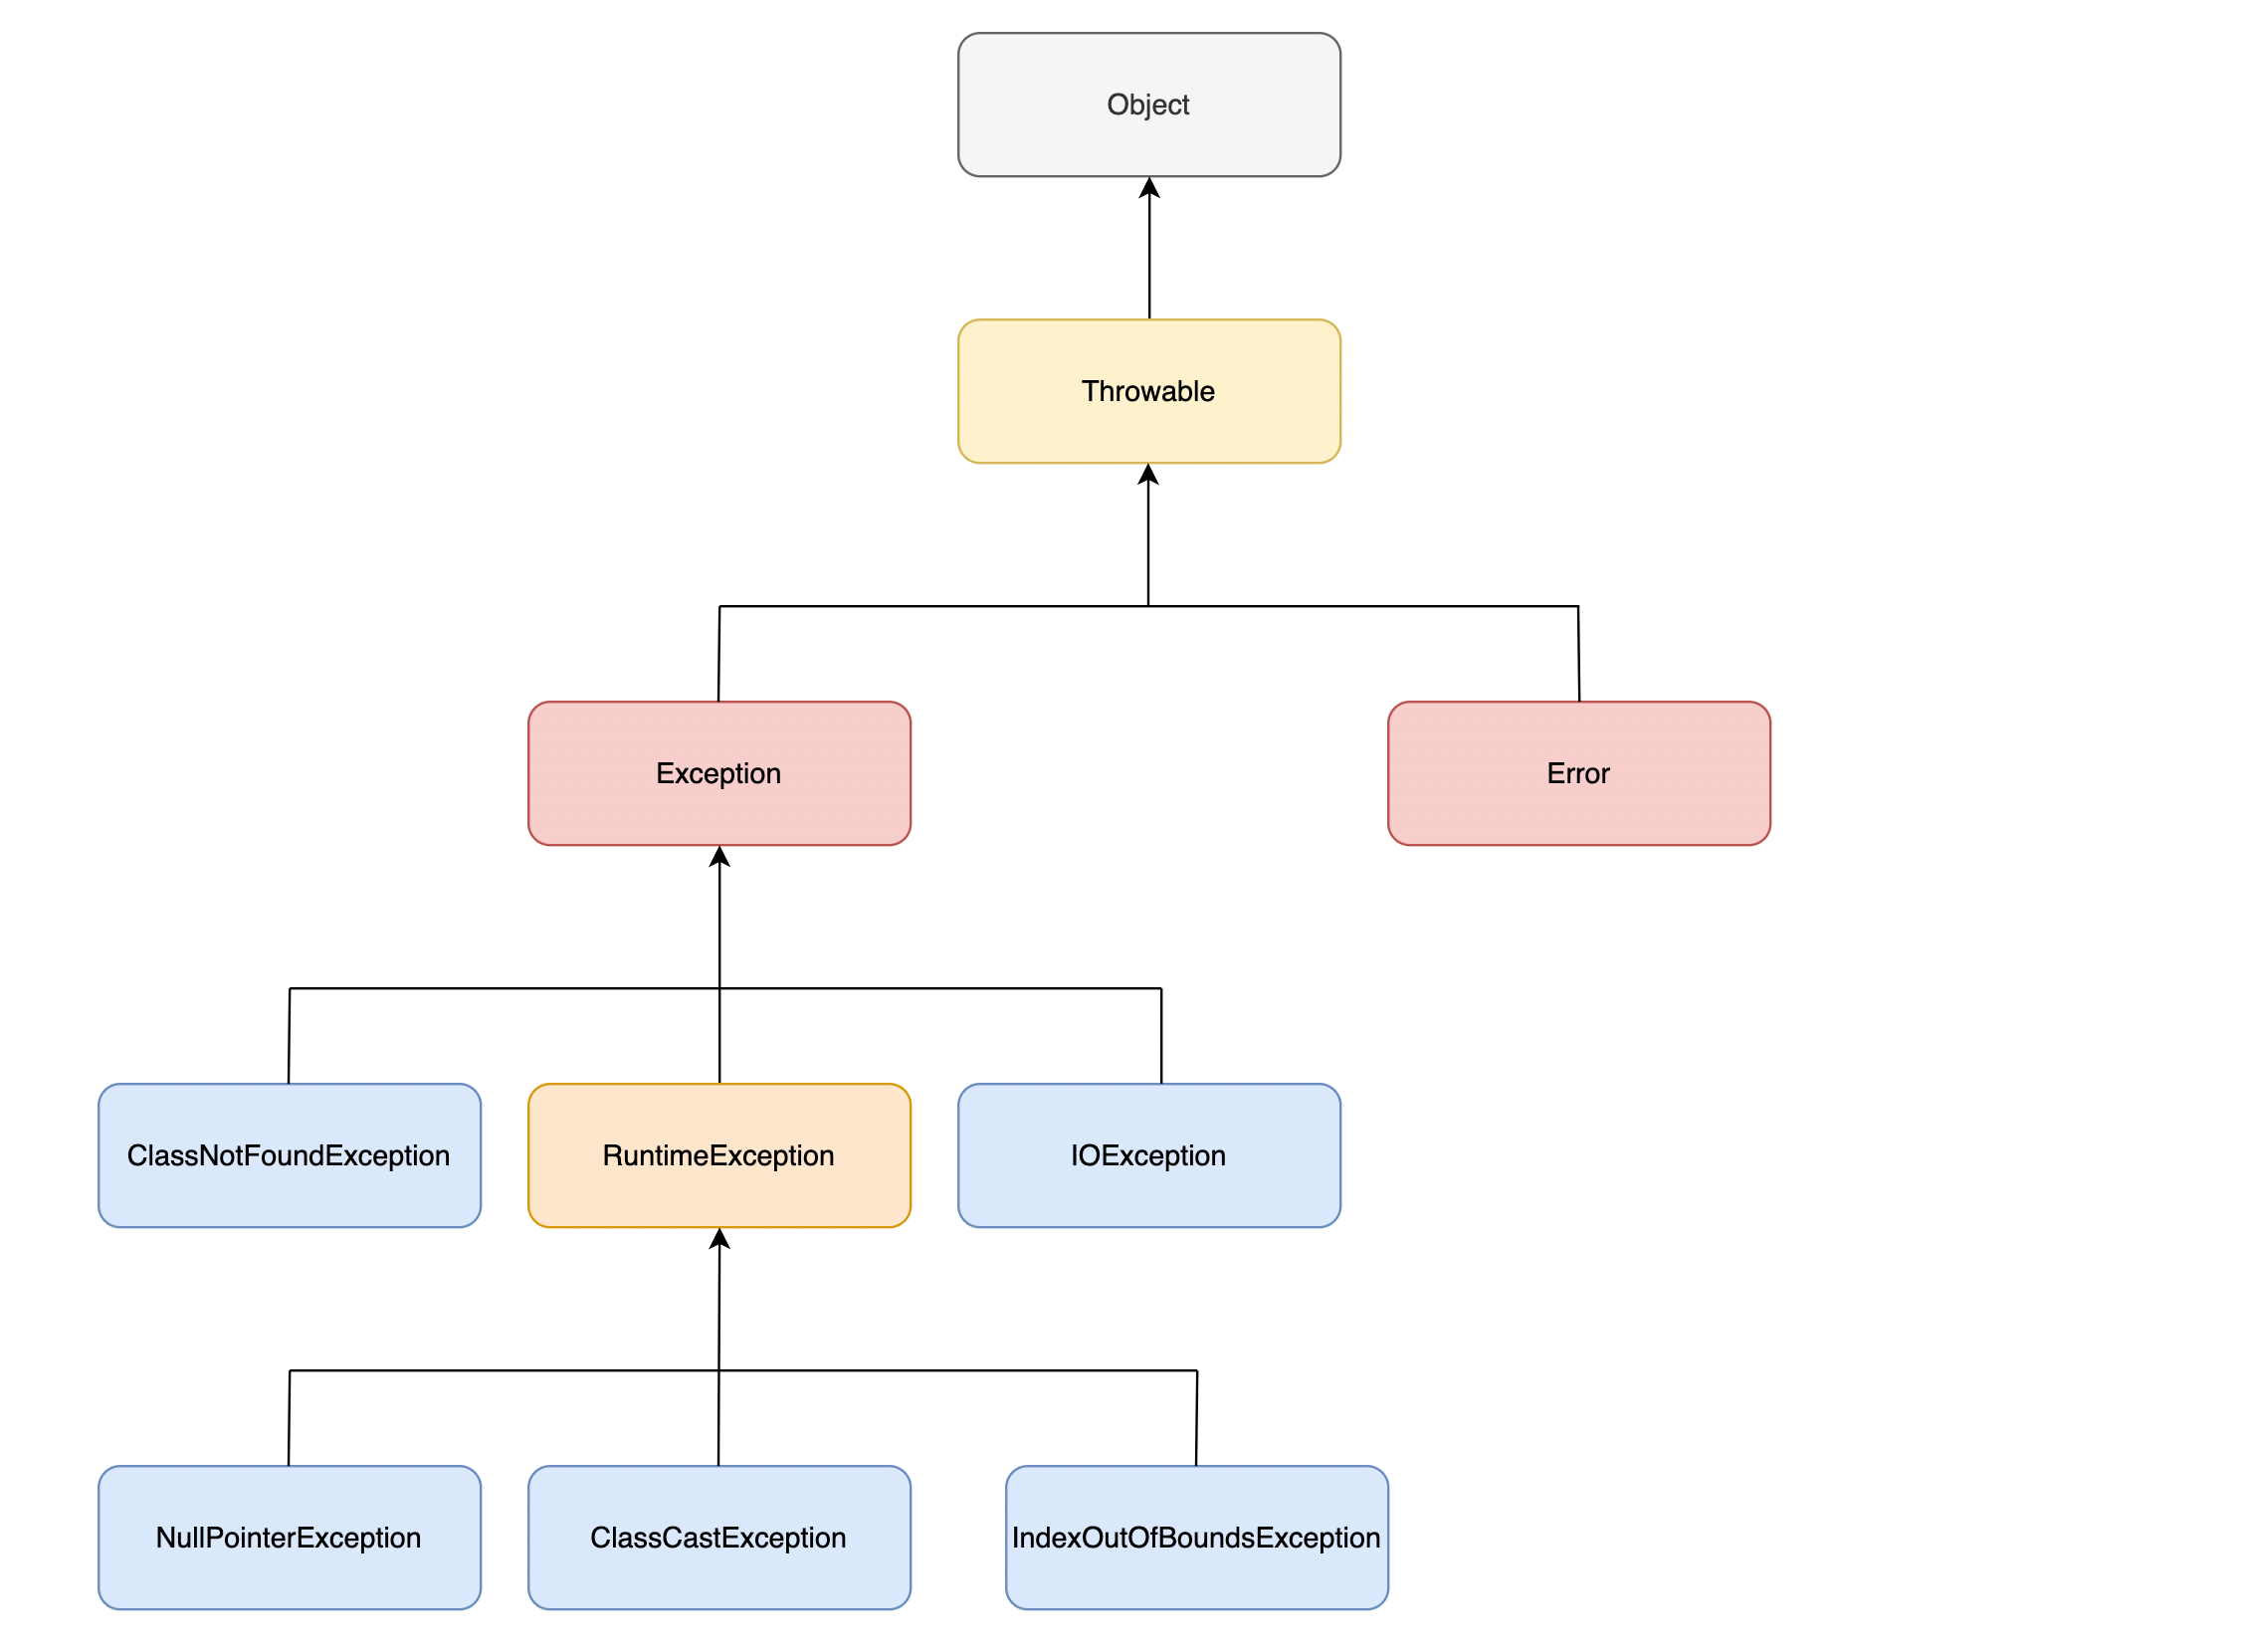
Exception hierarchy
All exceptions are subclasses of Throwable. According to the Java docs:
The Throwable class is the superclass of all errors and exceptions in the Java language. Only objects that are instances of this class (or one of its subclasses) are thrown by the Java Virtual Machine or can be thrown by the Java
throwstatement.
Types of exceptions
In Java, exceptions are mainly categorized into two types:
Checked Exceptions: These exceptions are checked at compile time. If you call a method that throws an exception, then, as the caller, you should either handle the exception or declare it in the throws clause. Examples of checked exceptions include IOException, NoSuchMethodException, and ClassNotFoundException.
Unchecked Exceptions: These exceptions are not checked at compile time. Examples of unchecked exceptions include NullPointerException, ArithmeticException, and ArrayIndexOutOfBoundsException.
One interesting thing to note is that Kotlin doesn’t have checked exceptions.
Consider the following code:
fun doSomething() {
    val list = listOf("one", "two", "three")
    val item = list[4]
    println("Item: $item")
}
What do you think would happen if you called this method? If your answer is that it would throw a runtime exception ArrayIndexOutOfBoundsException, you are correct.

Let’s consider another piece of code:
fun getString() = "Hello!"

fun doSomething() {
    val result = getString() as Int
    println("Result: $result")
}
If the doSomething method is called, you will get a ClassCastException.

Sometimes, the built-in exception classes are not enough to define a certain scenario. In such cases, you can even create your own exceptions:
class MyException(
    override val message: String = "Something went wrong!"
) : Exception(message = message)

// you can throw it as follows
fun doSomething() {
    throw MyException(message = "Error")
}
If you want to run these snippets, you can do so here.
Different ways of exception handling
Now that you know about exceptions, let’s see how you can handle them. Let’s consider a small piece of code that throws an exception.
fun throwException() {
    throw Exception("Manual Exception")
}
If we call this method and do not handle the exception, our application will crash and we’ll end up with the “App keeps stopping” dialog. The easiest way to handle this exception is to catch it and wrap the method call in a try block. You can also do some cleaning up in the finally block if required.
try {
    throwException()
} catch (e: Exception) {
    // do something
    // once this exception is handled
} finally {
    // do some clean up
}
If you just want to catch some exception and do not have any additional work to execute in the finally block, Kotlin provides a runCatching function:
runCatching {
    throwException()
}
If you want to run these snippets you can do so here.
Propagating exceptions
There could be certain scenarios in which a method throws different exceptions, and you have to catch only some of them and propagate the others higher up.
Consider the following piece of code:
fun throwDifferentExceptions() {
    if (condition1) {
        throw IllegalArgumentException()
    }
    if (condition2) {
        throw CustomException1()
    }
    if (condition3) {
        throw CustomException2()
    }
}
Using try/catch, you can do the following:
try {
    throwDifferentExceptions()
} catch (e: IllegalArgumentException) {
    // do something if required
    // and also propagate this higher up
    throw e
} catch (e: CustomException1) {
    // handle this exception here
    // do not propagate this
} catch (e: CustomException2) {
    // handle this exception here
    // do not propagate this
}
Using runCatching, you can do the following:
  runCatching {
    throwDifferentExceptions()
}.onFailure { e: Throwable ->
    when (e) {
        is IllegalArgumentException -> {
            // handle this exception here
            // do not propagate this
        }
        is CustomException1 -> {
            // do something if required
            // and also propagate this higher up
            throw e
        }
        is CustomException2 -> {
            // handle this exception here
            // do not propagate this
        }
        else -> {
            // handle any unknown exception here
            // do not propagate this
        }
    }
}
The important thing to note here is that since you are propagating the exceptions, you will have to handle them higher up.
If you want to run these snippets, you know the drill.
Android exception handling
Let’s consider a sample application that uses the above techniques to handle exceptions. The app has a single screen with two buttons that simulate doing some work when they are clicked. The first button has the necessary exception handling, and clicking on the second button will cause the app to crash.
The code is quite simple:
class MainActivity : ComponentActivity() {
    override fun onCreate(savedInstanceState: Bundle?) {
        super.onCreate(savedInstanceState)
        enableEdgeToEdge()
        setContent {
            SentryDemoTheme {
                RealisticUI()
            }
        }
    }
}

@Composable
fun RealisticUI() {
    var username by remember { mutableStateOf("") }
    var password by remember { mutableStateOf("") }

    Column(
        modifier = Modifier
            .fillMaxSize()
            .padding(16.dp),
        horizontalAlignment = Alignment.CenterHorizontally,
        verticalArrangement = Arrangement.Center
    ) {
        Text("Login Screen")
        Spacer(modifier = Modifier.height(16.dp))
        OutlinedTextField(
            value = username,
            onValueChange = { username = it },
            label = { Text("Username") }
        )
        Spacer(modifier = Modifier.height(8.dp))
        OutlinedTextField(
            value = password,
            onValueChange = { password = it },
            label = { Text("Password") }
        )
        Spacer(modifier = Modifier.height(16.dp))
        Button(onClick = { /* Handle login */ }) {
            Text("Login")
        }
        Spacer(modifier = Modifier.height(32.dp))

        // Demo buttons for testing Sentry
        Button(onClick = {
            try {
                throw RuntimeException("This is a test crash to trigger Sentry snapshot.")
            } catch (e: Exception) {
                Sentry.captureException(e)
            }
        }) {
            Text("Test Handled Exception")
        }
        Spacer(modifier = Modifier.height(8.dp))
        Button(onClick = {
            Thread.sleep(6000) // Block main thread for 6 seconds to trigger ANR
        }) {
            Text("Trigger ANR")
        }
    }
}
In a real-world application, it is incredibly difficult to handle all exceptions, even if we try our best. We may get an internal library exception or there may be an edge-case scenario that went unhandled. What steps can we take to minimize how often our application crashes?
It’s possible to create a default exception handler using the Thread.UncaughtExceptionHandler interface and use it as a fallback. However, we would never recommend doing this in your debug app, as you would always want immediate feedback for any crash.
// Activity code

val exceptionHandler =
    Thread.UncaughtExceptionHandler { _: Thread, e: Throwable ->
        handleUncaughtException(e)
    }

private fun attachUnhandledExceptionHandler() {
    if (BuildConfig.DEBUG.not()) {
        Thread.setDefaultUncaughtExceptionHandler(exceptionHandler)
    }
}

private fun handleUncaughtException(e: Throwable) {
    // do something for this exception
}
Now when we click the second button, even though we haven’t explicitly handled the exception, the app doesn’t crash.
So far we have seen different ways to handle exceptions as well as how to provide a default unhandled exception handler. Now, let’s go one step further and see how we can monitor these exceptions.
Handling ANRs
One of the most frustrating issues for Android users is when an app becomes unresponsive - this is known as an ANR (“Application Not Responding”) event. ANRs occur when the main UI thread is blocked for more than five seconds, causing the system to display the dreaded “App isn’t responding” dialog.
What causes ANRs?
Common causes of ANRs include:
Heavy computation on the main thread
Synchronous network requests
Database operations without proper threading
Deadlocks between threads
Waiting for locks held by background threads
Preventing ANRs
The best way to handle ANRs is to prevent them from occurring by keeping the main thread free for UI operations:
class DataRepository {
    // Bad: Network request on main thread
    fun fetchDataSync(): List<Data> {
        return api.getData() // This blocks the UI thread
    }

    // Good: Use coroutines for async operations
    suspend fun fetchData(): List<Data> = withContext(Dispatchers.IO) {
        api.getData()
    }

    // Good: Heavy computation on background thread
    suspend fun processLargeDataset(data: List<Data>): ProcessedData =
        withContext(Dispatchers.Default) {
            data.map { processItem(it) } // CPU-intensive work
        }
}
Modern ANR detection
The good news is that Sentry automatically detects ANRs without requiring manual implementation. The Sentry Android SDK, for example, automatically captures ANR events using multiple detection methods:
Application Exit Info API (Android 11+): Offers the most accurate ANR detection with full stack traces and thread information
Watchdog Threads: Provide real-time detection by monitoring main thread responsiveness
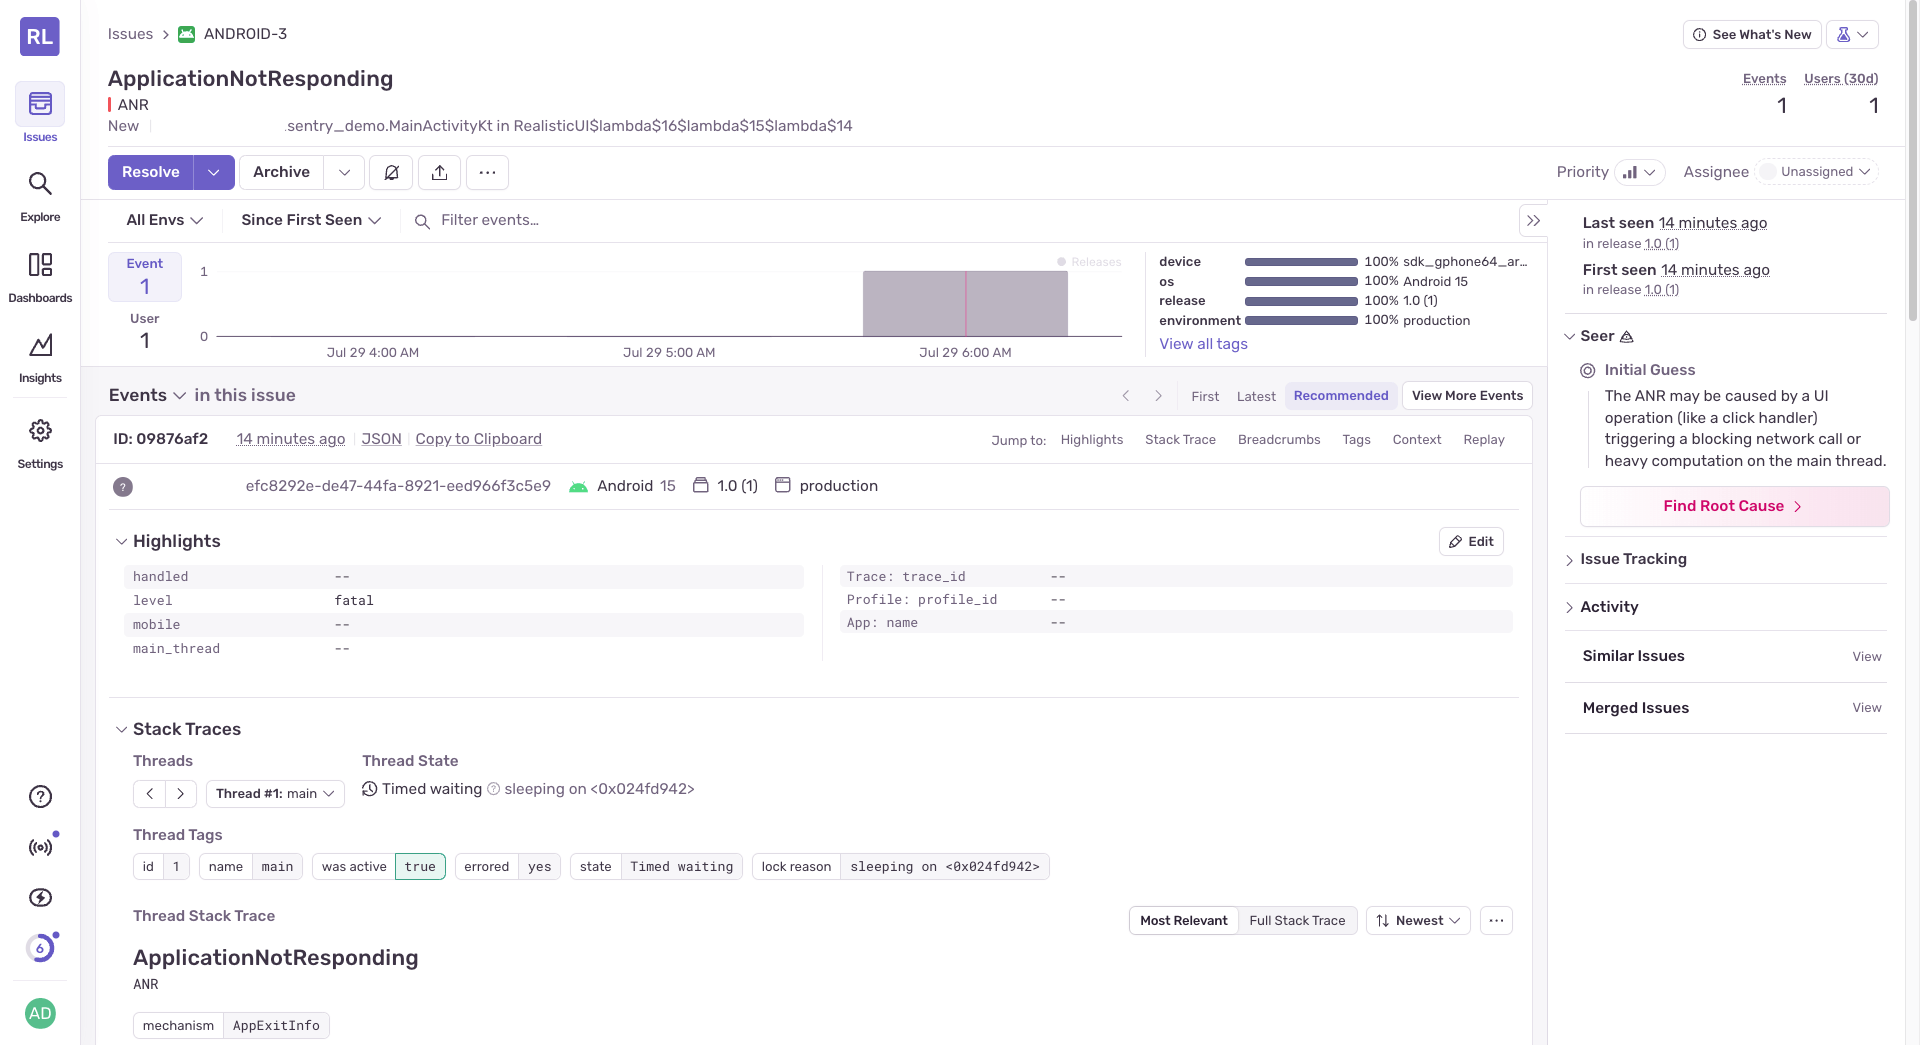
Application not responding
Sentry also provides breadcrumbs for ANRs that can be used to understand the sequence of events leading to the ANR.
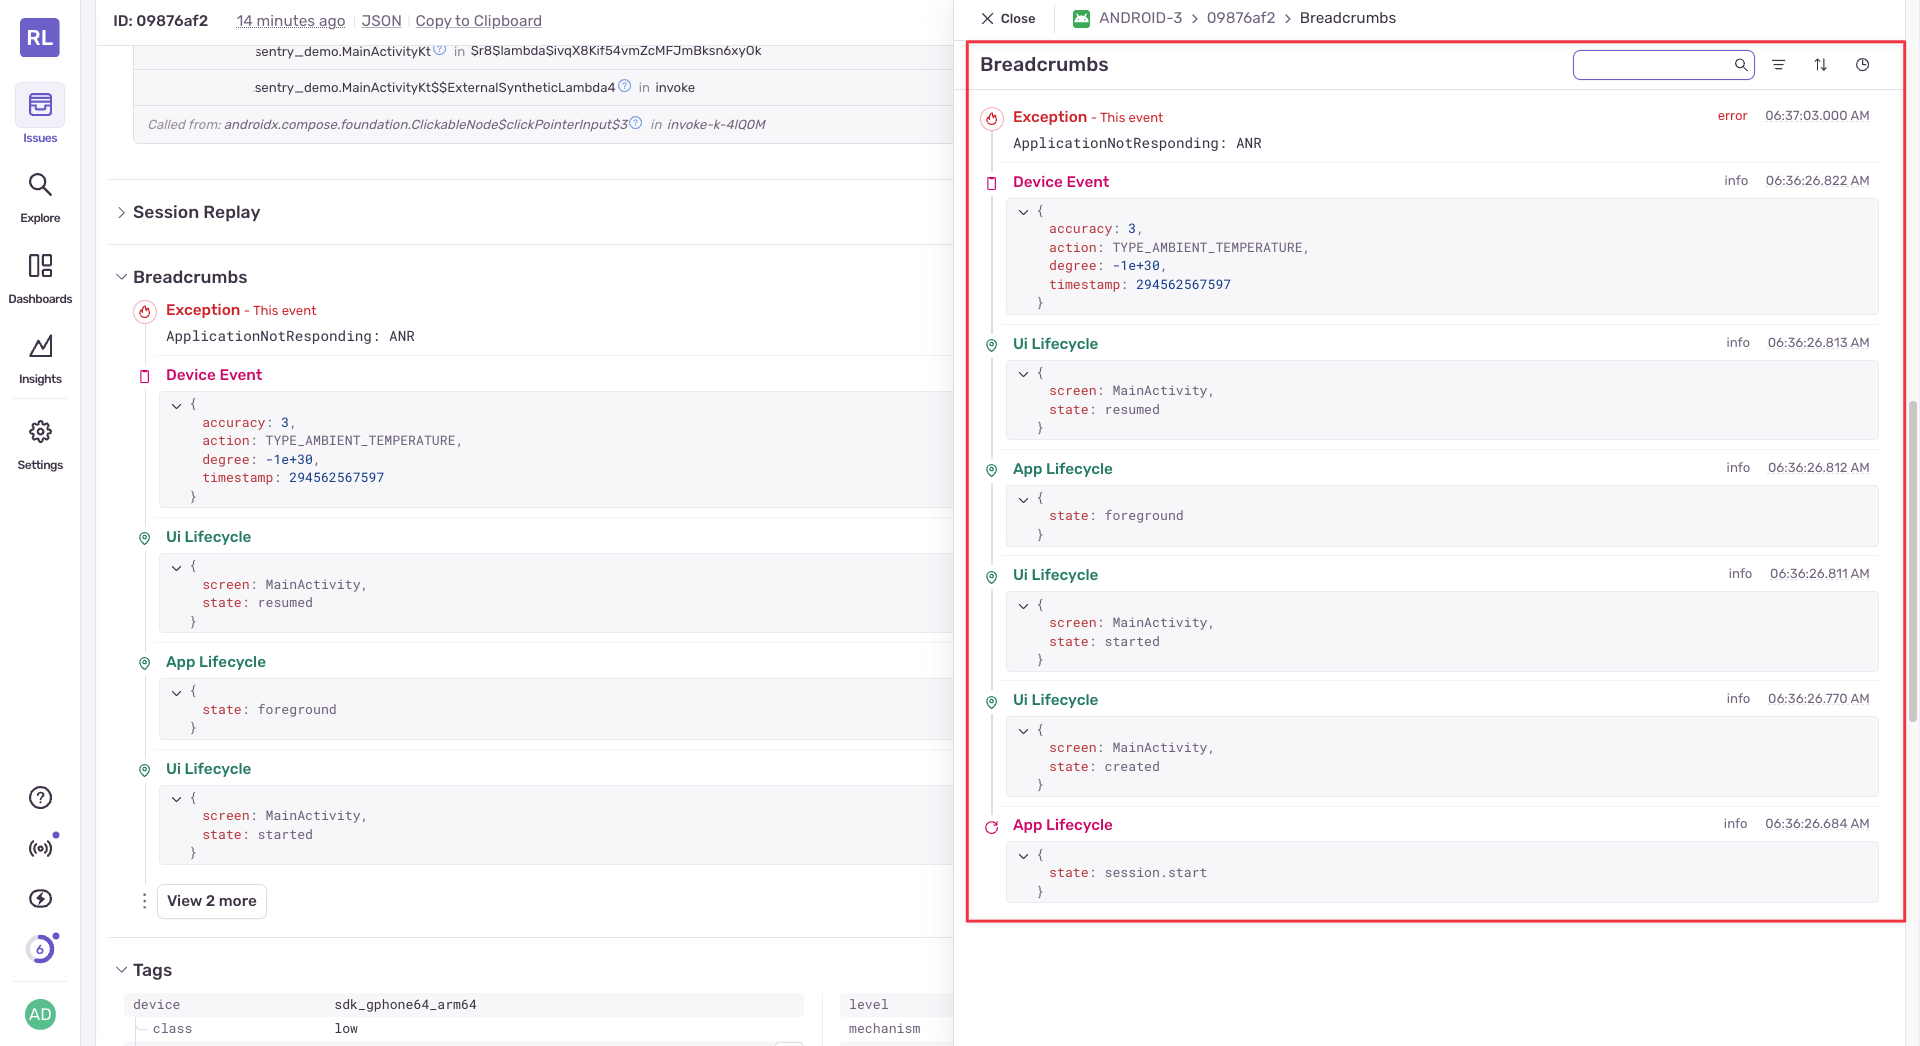
Application not responding breadcrumbs
So far, we have seen the different ways we can handle exceptions and ANRs. Now, let’s go one step further and see how we can monitor these issues in production.
Comprehensive monitoring with Sentry
Once you have released your app, you’ll want comprehensive visibility into crashes, ANRs, performance issues, and user behavior. The Sentry Android SDK provides automatic monitoring that goes far beyond basic crash reporting.
Setting up Sentry
The fastest way to get Sentry monitoring in your Android app is using the Sentry Wizard. This automated tool handles the entire setup process for you:
brew install getsentry/tools/sentry-wizard && sentry-wizard -i android --saas --org <your-org> --project <your-project>Manual setup
If you prefer manual setup, add the Sentry Gradle plugin to your app/build.gradle.kts:
plugins {
    id "com.android.application"
    id "io.sentry.android.gradle" version "5.8.0"
}
Then, configure Sentry in your AndroidManifest.xml:
<application>
    <!-- Required: set your sentry.io project identifier (DSN) -->
    <meta-data
        android:name="io.sentry.dsn"
        android:value="https://examplePublicKey@o0.ingest.sentry.io/0" />

    <!-- Enable automatic breadcrumbs for user interactions -->
    <meta-data
        android:name="io.sentry.traces.user-interaction.enable"
        android:value="true" />

    <!-- Enable screenshot for crashes -->
    <meta-data
        android:name="io.sentry.attach-screenshot"
        android:value="true" />

    <!-- Enable view hierarchy for crashes -->
    <meta-data
        android:name="io.sentry.attach-view-hierarchy"
        android:value="true" />

    <!-- Enable performance monitoring (adjust sample rate in production) -->
    <meta-data
        android:name="io.sentry.traces.sample-rate"
        android:value="1.0" />

    <!-- Enable profiling (adjust sample rate in production) -->
    <meta-data
        android:name="io.sentry.traces.profiling.session-sample-rate"
        android:value="1.0" />

    <!-- Enable Session Replay -->
    <meta-data
        android:name="io.sentry.session-replay.on-error-sample-rate"
        android:value="1.0" />
    <meta-data
        android:name="io.sentry.session-replay.session-sample-rate"
        android:value="0.1" />
</application>
The Android Gradle plugin (version 5.8.0) automatically adds the Sentry Android SDK (version 8.17.0) to your app. Sentry uses a ContentProvider to initialize automatically based on your manifest configuration, ensuring crashes and metrics are captured from app start.
Manual exception reporting
To track handled exceptions, use the following:
try {
    riskyOperation()
} catch (e: Exception) {
    Sentry.captureException(e)
    // Handle the exception gracefully
    showErrorMessage()
}

// Or with additional context
Sentry.withScope { scope ->
    scope.setTag("operation", "user_checkout")
    scope.setLevel(SentryLevel.WARNING)
    scope.setContext("user", mapOf("id" to userId, "plan" to userPlan))
    Sentry.captureException(exception)
}
Session Replay for mobile debugging
One of the most powerful features for debugging mobile issues is Session Replay. When enabled, Sentry captures a video-like recreation of user sessions, showing exactly what users saw and did before a crash or error occurred.
Getting started with Session Replay
First, ensure you are using version 7.20.0 or later of the Sentry Android SDK. If you’re using the Gradle plugin (version 5.8.0), it automatically includes the Sentry Android SDK version 8.17.0:
// app/build.gradle.kts
plugins {
    id("com.android.application")
    id("io.sentry.android.gradle") version "5.8.0"
}
Alternatively, install the SDK directly as follows:
// app/build.gradle.kts
dependencies {
    implementation("io.sentry:sentry-android:8.17.0")
}
Configure Session Replay in your AndroidManifest.xml:
<application>
    <!-- Capture 100% of sessions with errors -->
    <meta-data
        android:name="io.sentry.session-replay.on-error-sample-rate"
        android:value="1.0" />

    <!-- Capture 10% of normal sessions (adjust for production) -->
    <meta-data
        android:name="io.sentry.session-replay.session-sample-rate"
        android:value="1.0" />
</application>
Privacy configuration
By default, the Sentry Android SDK aggressively redacts all text and images for privacy. You can customize this behavior as follows:
// Default configuration (masks everything)
SentryAndroid.init(this) { options ->
    options.sessionReplay.maskAllText = true
    options.sessionReplay.maskAllImages = true
}
Testing and production setup
For testing, set the session sample rate to 1.0 to capture every session:
<!-- Testing: capture all sessions -->
<meta-data
    android:name="io.sentry.session-replay.session-sample-rate"
    android:value="1.0" />
For production, lower the session sample rate, but keep the error sample rate high:
<!-- Production: capture 10% of sessions but 100% of error sessions -->
<meta-data
    android:name="io.sentry.session-replay.session-sample-rate"
    android:value="0.1" />
<meta-data
    android:name="io.sentry.session-replay.on-error-sample-rate"
    android:value="1.0" />
Enhanced debugging with breadcrumbs and context
Sentry automatically captures breadcrumbs - the trails of events leading up to errors.
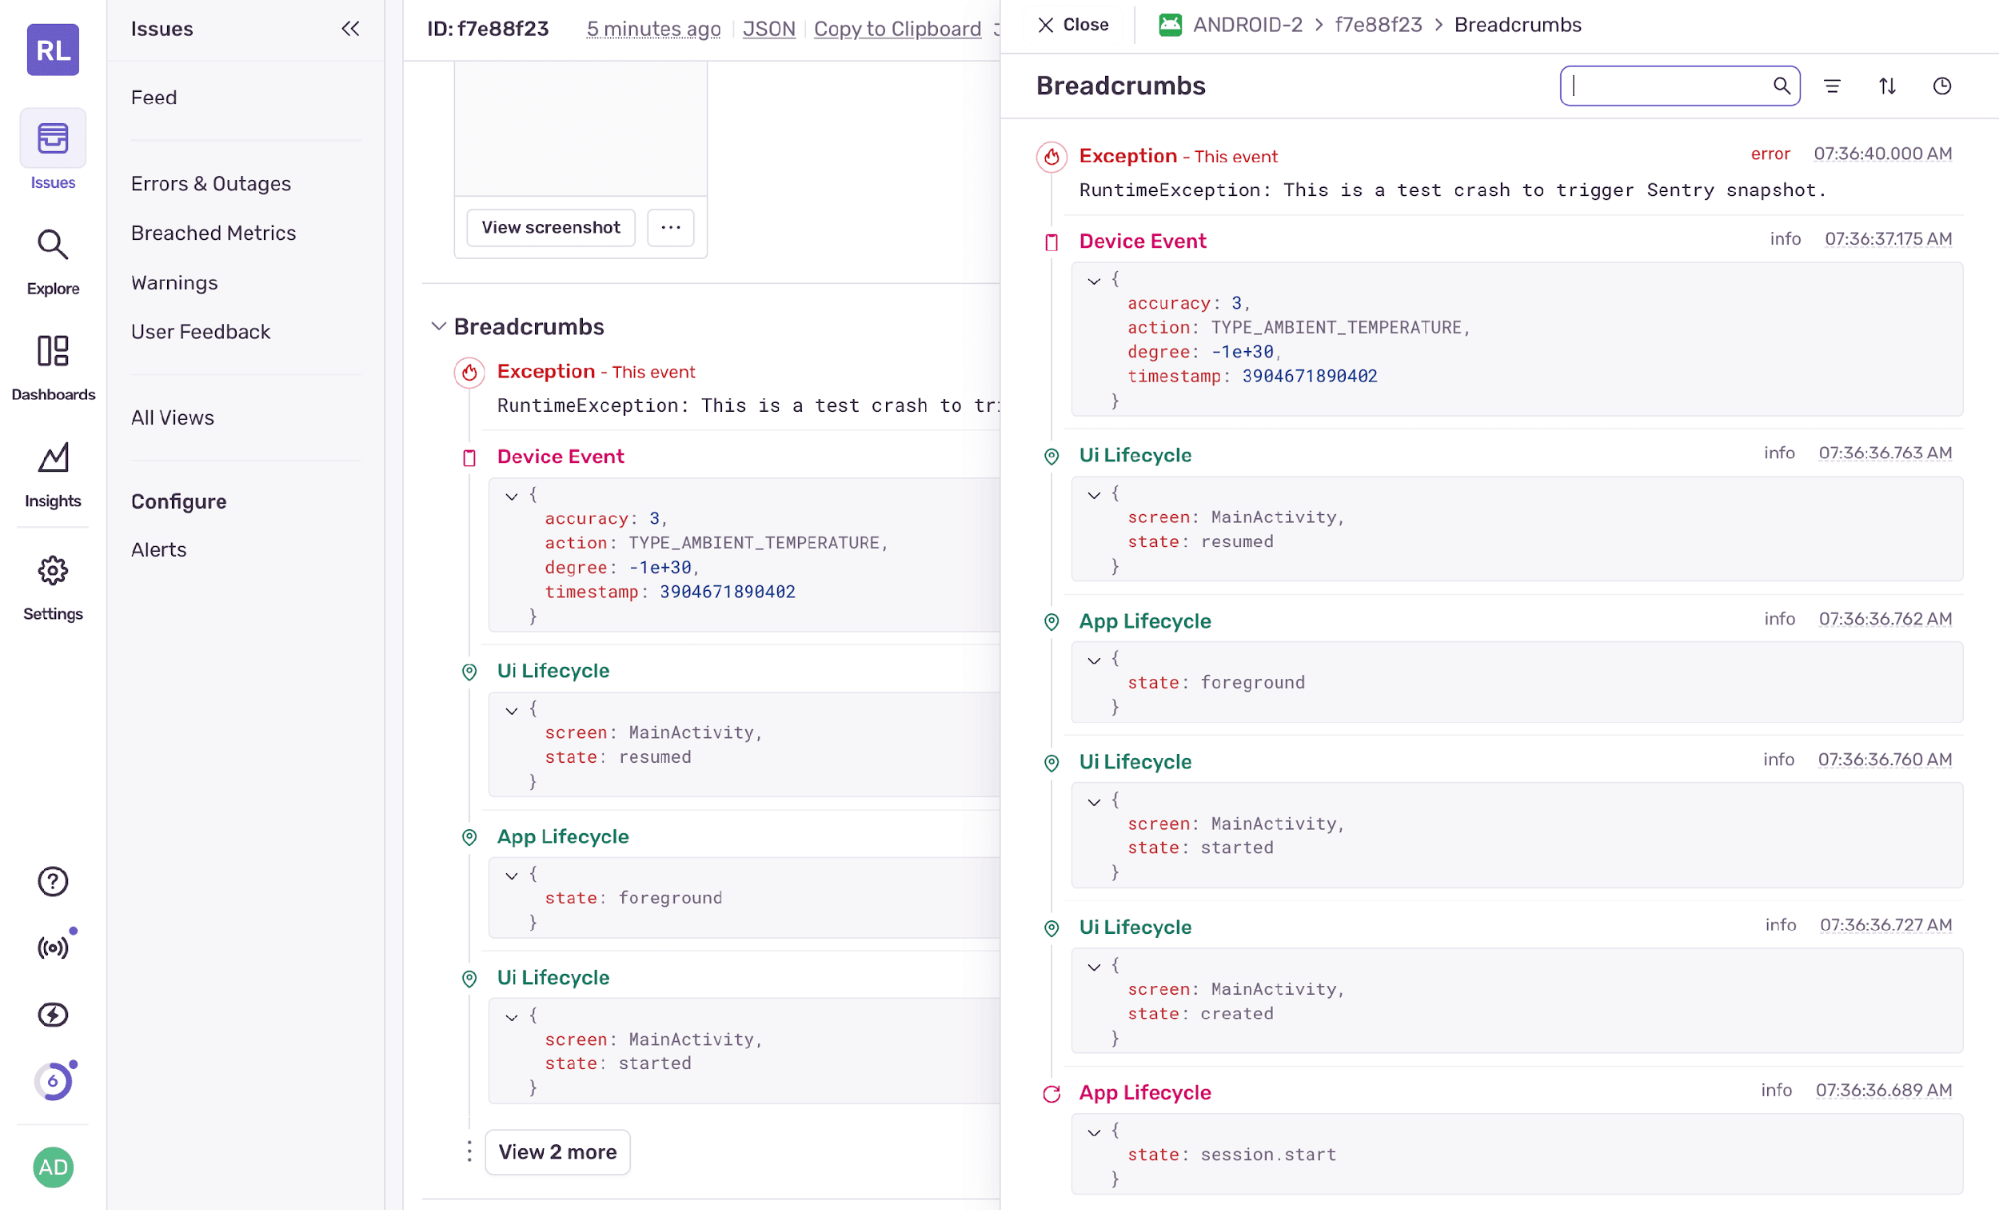
Exception breadcrumbs
When an error occurs, you’ll see the complete context, including:
Device information (such as OS version, memory, and battery level)
User actions and navigation flows
Network requests and responses
Custom tags and metadata
Screenshots captured at the moment of error
Quick recap
Exception handling in Android has evolved significantly. While the core principles remain the same, modern tools provide unprecedented visibility into production issues. By combining proper exception handling techniques with comprehensive monitoring, you can build more stable apps and resolve issues more quickly when they do occur.