New Android SDK How-to
New Android SDK How-to
Our Android SDK version 2.0.0 just reached Beta. To provide you with a smooth start, we prepared this tutorial that will show you how to install the SDK and how to get the most out of the main features.
Basic Usage
Let’s start with a minimalistic use-case so you can test the basic functionality.
In this section, we will go over the installation of the SDK, uploading the proguard/r8 mapping files, and finally, we will crash your application.
In five minutes, you'll be able to see in the Sentry UI:
all uncaught exceptions from your Java or Kotlin code
all crashes caused by problems in the native code
ANR reports
Installation
To install the SDK into your project, you need to add the SDK as a dependency to your build.gradle file and set the compatibility options to be compatible with Java 1.8.
// Add compatibility options to be comptible with Java 1.8
compileOptions {
sourceCompatibility = JavaVersion.VERSION_1_8
targetCompatibility = JavaVersion.VERSION_1_8
}
// Add Sentry Android as a dependency
dependencies {
// this dependency contains SDK and NDK
implementation 'io.sentry:sentry-android:{version}'
// if you want to use just the SDK you can use this library:
// implementation 'io.sentry:sentry-android-core::{version}'
}You can find the support requirements in the Sentry Android API documentation.
Once the library is included, you need to add a DSN (Client Key) into your AndroidManifest.xml.
(You can find the DSN - Client Key in the project settings UI.)
<!-- DSN in your AndroidManifestt.xml should be sub element of the application element -->
<meta-data android:name="io.sentry.dsn" android:value="{replace with your DSN}" />
Proguard and R8
Now, all the uncaught exceptions will be captured by the SDK and reported to Sentry.
If you use Proguard or R8, so far your error reports will only show the obfuscated stack trace. Let’s fix that.
To provide the proper symbolicated stack trace in the UI, we need to get your Proguard/R8 mapping files. The easiest way to upload the files is to use our Gradle plugin that will do it for you automatically.
Register the plugin in the project build.gradle:
buildscript {

  repositories {

    dependencies {

      classpath 'io.sentry:sentry-android-gradle-plugin:1.7.28'

}}}
And in your app build.gradle file apply the plugin:
apply plugin: 'io.sentry.android.gradle'The last part is the configuration of the plugin. The configuration is done in the file sentry.properties, which should be located in the root directory of your project.
defaults.project=your-project
defaults.org=your-org
auth.token=YOUR_AUTH_TOKEN
For more details about the configuration, please check docs.sentry.io/cli/configuration/#configuration-values
Crash Time!
You're all set and ready for a proper crash. To test the functionality, we will throw an exception outside of the try-catch block.
public class MainActivity extends AppCompatActivity {

    @Override
    protected void onCreate(Bundle savedInstanceState) {
        super.onCreate(savedInstanceState);
        setContentView(R.layout.activity_main);
        throw new RuntimeException();
    }
}
The SDK will catch the exception, build a crash report, and persist the report to the disk.
We persist these reports before we send them — in case the device is offline when the crash happens — because the system won’t let you run extended operations after the crash.
Once the report is persisted, we will try to send the report. If it fails, the report will be sent once the application is restarted.
Error Reports
Now you should have an overview of all the crashes that affect your application. You don't need to wait for the application to crash for insight into the health of your application. You can also report exceptions and errors that affect your application.
Button negative_index_button = (Button) findViewById(R.id.negative_index);
negative_index_button.setOnClickListener(new View.OnClickListener() {
    @Override
    public void onClick(View view) {
        try {
            int[] a = new int[-5];
        } catch(Exception e) {
            // Handled Exception that is going to be reported
            // to the Sentry together with the context.
            Sentry.captureException(e);
        }
     }
});
If you're not excited about manual instrumentation of the code to receive all the exceptions, check out the last section of this tutorial that covers integrations.
Take your error reports to the next level
Before we extend the error reports, you need to first get some insight into how the SDK works.
Once the application is started, the SDK builds context around the crash or attaches an error time to the report. The context will help you identify what happened before the crash, on which device, and to which user.
The default context for the Android SDK will provide you with information about the device and system on which the error occurred, but with the usage of the API, you can add much more to your error report. The basic components of the error reports are tags, breadcrumbs, and information about the user.
User details
The first thing to add to your error report is information about the user of your application.
// Once you know who the user is you can provide the information to the SDK so that you can
// see the information on the error report.
User user = new User();
user.setEmail("test@test.test");
user.setUsername("test");
// You can also add additional information about your user using the method
// user.setOthers(Map<String, String> other)

// With the following method you set the user to the context and the user information will be
// attached to every error and crash report.
Sentry.setUser(user);
Tags
Tags are key-value pairs that you can add to a crash or error’s context in Sentry.
Here's a specific example: If you want to prioritize bugs that appear during the checkout process and the process is connected to a particular activity, you can add a tag that will store a value of the current activity.
To do so, we will register the activity lifecycle callback in our main application class and set the tag whenever a new activity is created.
public class MyApplication extends Application {

    public void onCreate() {
        super.onCreate();

        this.registerActivityLifecycleCallbacks(new ActivityLifecycleCallbacks() {
            @Override
            public void onActivityCreated(@NonNull Activity activity, @Nullable Bundle savedInstanceState) {
                Sentry.setTag("activity",activity.getComponentName().flattenToShortString());
            }

            @Override
            public void onActivityStarted(@NonNull Activity activity) {}

            @Override
            public void onActivityResumed(@NonNull Activity activity) {}

            @Override
            public void onActivityPaused(@NonNull Activity activity) {}

            @Override
            public void onActivityStopped(@NonNull Activity activity) {}

            @Override
            public void onActivitySaveInstanceState(@NonNull Activity activity, @NonNull Bundle outState) {}

            @Override
            public void onActivityDestroyed(@NonNull Activity activity) {}
        });
  }
}
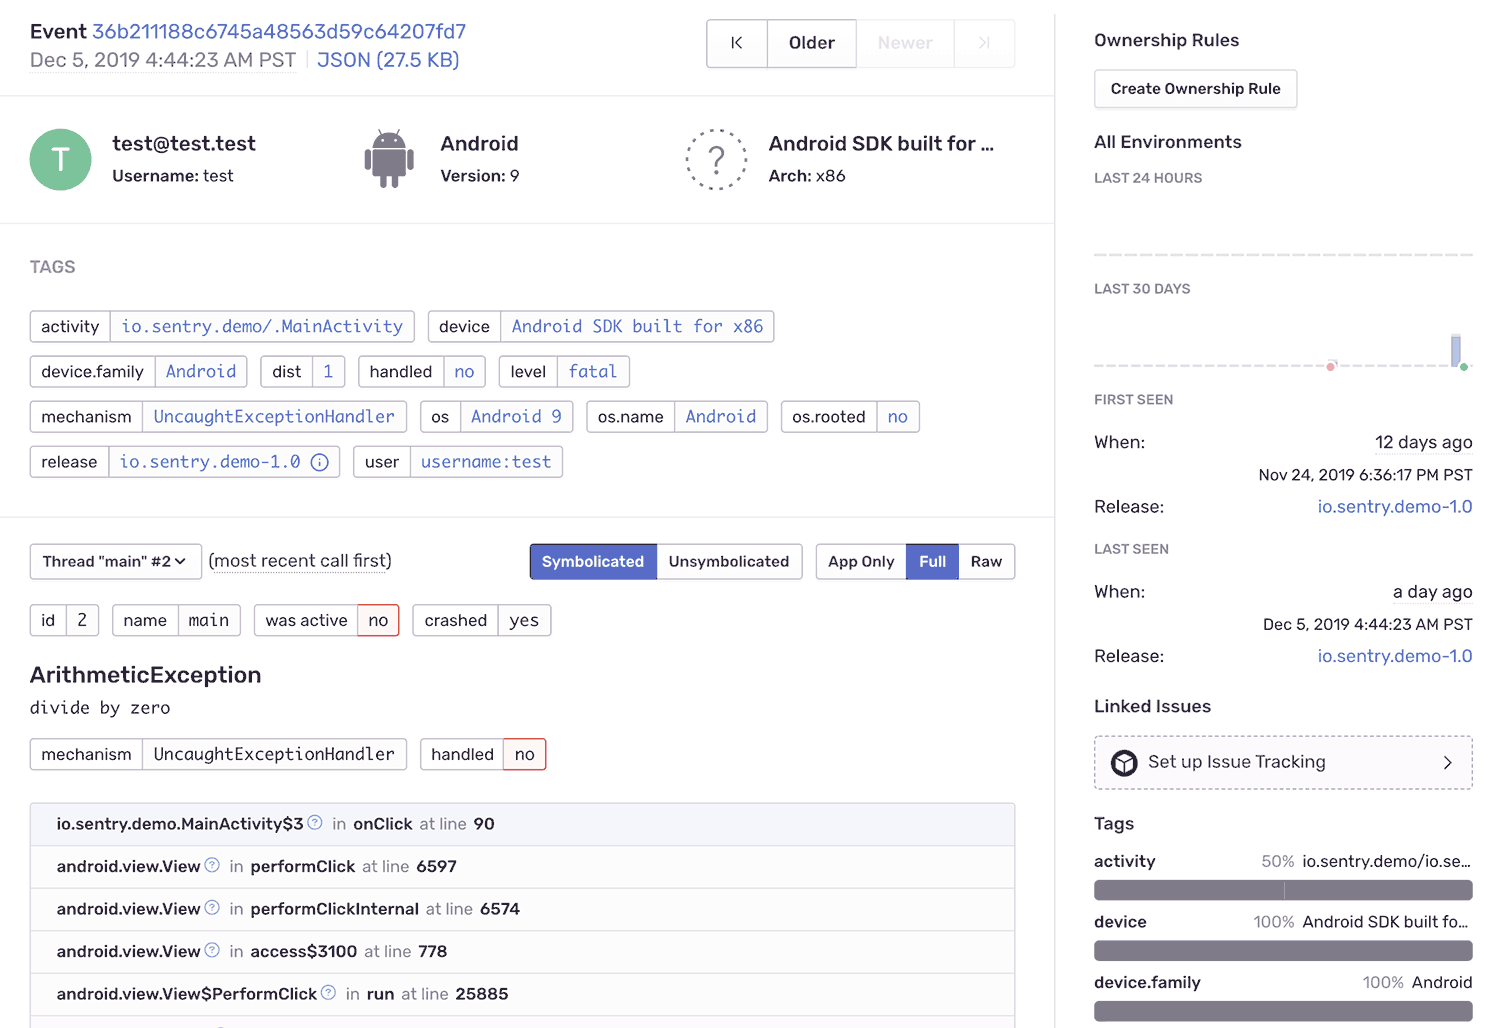
Once the error reports are grouped into issues, you can see a distribution of the tag values from all relevant crash reports in Sentry’s UI.

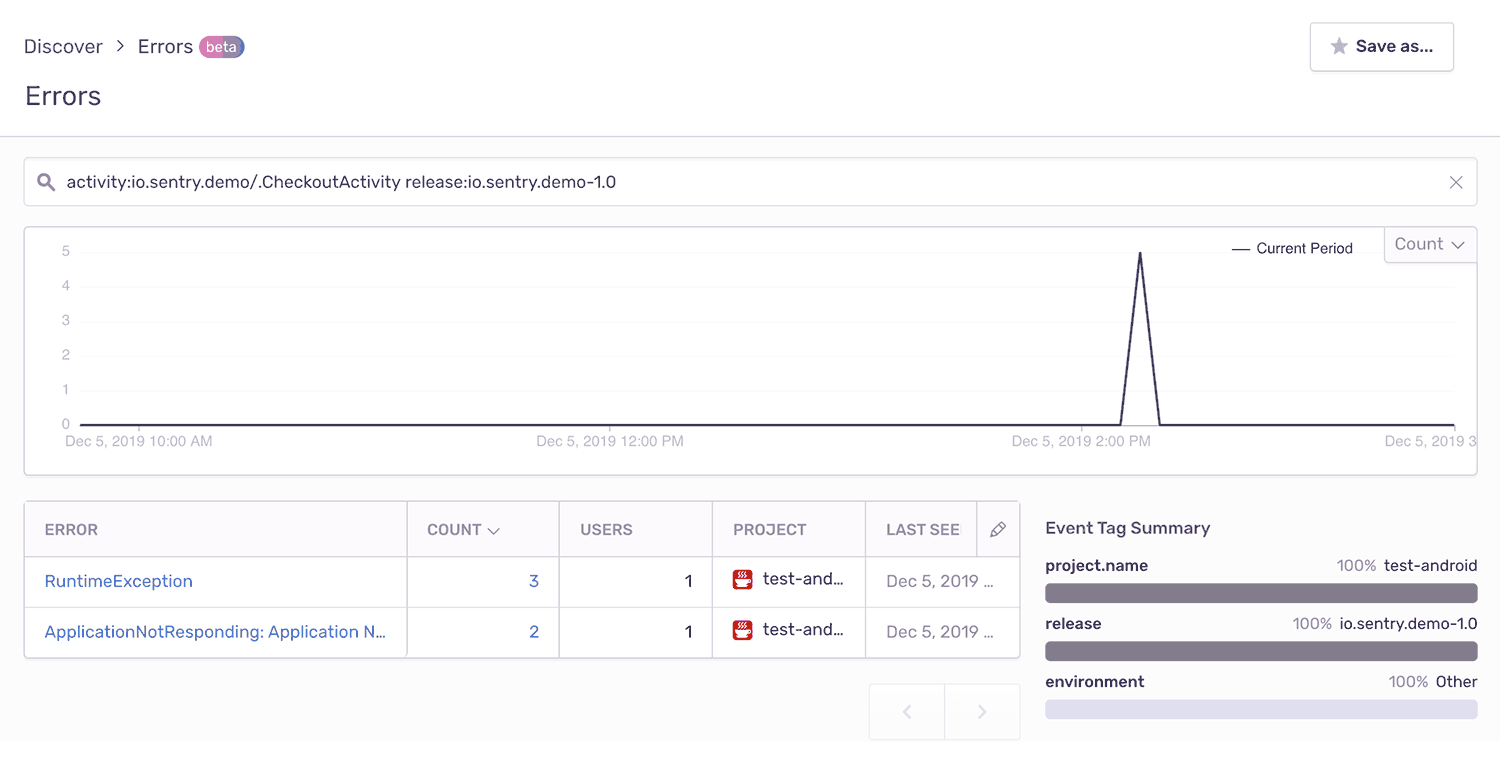
You can also filter the error reports in the UI based on the tag values.
These are the errors that affect our demo checkoutProcess in release 1.0 of our demo application.
Breadcrumbs
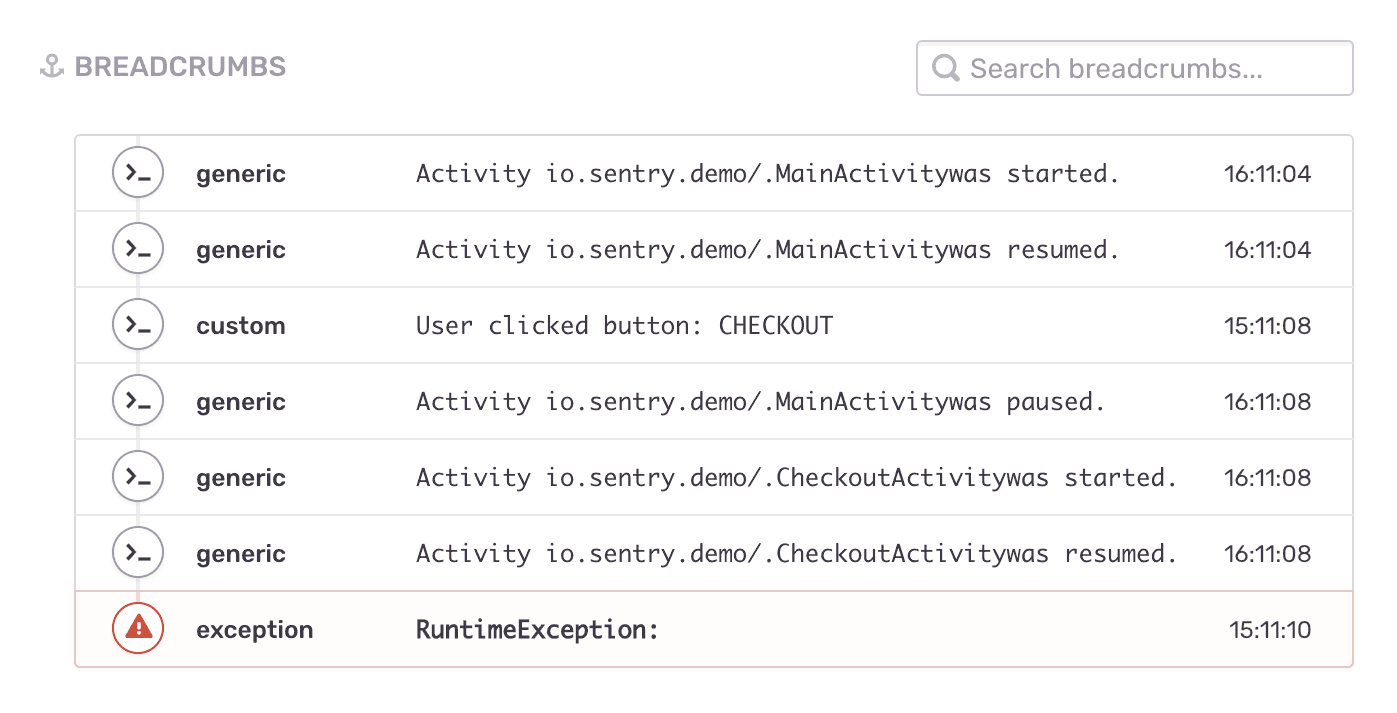
Breadcrumbs will provide insight into what happened before the crash/error occurred. They're like custom events that are logged into context.
To demonstrate what breadcrumbs do, we will extend the previous example so that you can see your user's activity history.
public class MyApplication extends Application {
    public void onCreate() {
        super.onCreate();
        this.registerActivityLifecycleCallbacks(new ActivityLifecycleCallbacks() {
            @Override
            public void onActivityCreated(@NonNull Activity activity, @Nullable Bundle savedInstanceState) {
                Sentry.setTag(“activity”,activity.getComponentName().flattenToShortString());
            }
            @Override
            public void onActivityStarted(@NonNull Activity activity) {
// highlight-start
                Sentry.addBreadcrumb(new Breadcrumb(“Activity ”
                    + activity.getComponentName().flattenToShortString() + “was started.“));
// highlight-end
            }
            @Override
            public void onActivityResumed(@NonNull Activity activity) {
// highlight-start
                Sentry.addBreadcrumb(new Breadcrumb(“Activity ”
                    + activity.getComponentName().flattenToShortString() + “was resumed.“));
// highlight-end
            }
            @Override
            public void onActivityPaused(@NonNull Activity activity) {
// highlight-start
                 Sentry.addBreadcrumb(new Breadcrumb(“Activity ”
                    + activity.getComponentName().flattenToShortString() + “was paused.“));
// highlight-end
            }
            @Override
            public void onActivityStopped(@NonNull Activity activity) {}
            @Override
            public void onActivitySaveInstanceState(@NonNull Activity activity, @NonNull Bundle outState) {}
            @Override
            public void onActivityDestroyed(@NonNull Activity activity) {}
        });
    }
}
This is how breadcrumbs look in the UI:
Integrations
As you have seen in the previous sections of the tutorial, you can use the API to extend the error report with a lot of useful information. Still, you need to manually instrument your code to extend the context.
To minimize the effort needed to get rich error reports, you can integrate the Android SDK with your favorite framework or library that provides information in the context or is used in the handling of exceptions.
One example is a logging library that can provide more context into what happened before the crash, and is also used for logging the exceptions.
To demonstrate the usage, we will integrate with the Timber logging library to report all logged exceptions. (Please note that the code below was created only for demonstration purposes. The proper integration will be provided soon!)
We will create a new SentryLogTree class that will interact with the Timber logging:
public class SentryLogTree extends Timber.Tree {

    @Override
    protected void log(int priority, @Nullable String tag, @NotNull String message, @Nullable Throwable t) {
        if  (t!=null){
            Sentry.captureException(t);
        }
    }

}
Then, we only need to initialize the Timber with the SentryLogTree:
public class MyApplication extends Application {

    public void onCreate() {
        super.onCreate();

        if (!BuildConfig.DEBUG){
            Timber.plant(new SentryLogTree());
        }
     }
}
And now, whenever you log an exception using Timber, the error is going to be reported into Sentry:
try {
   int[] a = new int[-5];
} catch(Exception e) {
   Timber.e(e);
}
Control the output
To make sure that you send to Sentry only the data that you want, we added a couple of callbacks that you can use to modify the content of the reports or to cancel the submit of the report.
To register the callbacks, we need to initialize the SDK manually in the code. But first, we need to cancel the automatic initialization of the SDK. To do so, you need to add the following line into your manifest file:
<!-- The meta data must be a child element of the application element -->
<meta-data android:name="io.sentry.auto-init" android:value="false" />
And now, the initialization up to us.
The initialization of the SDK should be done as soon as your application is started so that you can catch potential errors related to the initialization of your application. The recommended place is in the onCreate method of your Application class.
To initialize the SDK properly you need to provide a configuration that is provided via the Options class.
You can provide all the configuration options via code, but we prefer to store the static configuration in the manifest file and load it at the initialization of the SDK. To do so, we need to use SentryAndroid for the initialization instead of Sentry.init().
public class MyApplication extends Application {

    public void onCreate() {
        super.onCreate();
        // manual initialization of the SDK
        // to make sure that options you provided in the manifest.xml will be
        // loaded automatically we need to use class SentryAndroid for the initialization.
// highlight-start
        SentryAndroid.init(this, options -> {

        });
// highlight-end
    }
}
In this example, we introduce a callback that deletes the reports if the application is in debug mode. We need to register the callback onBeforeSend as an additional option during initialization.
public class MyApplication extends Application {

    public void onCreate() {
        super.onCreate();
        SentryAndroid.init(this, options -> {
// highlight-start
            // register the callback as an option
            options.setBeforeSend((event, hint) -> {
                //if the application is in debug mode discard the events
                if (BuildConfig.DEBUG)
                    return null;
                else
                    return event;
            } );
// highlight-end
        });
    }
}
What is next?
The SDK now reached Beta, and we hope that the GA is behind the corner!
Since this tutorial covered only half of the functionality, we will provide the second one that is oriented to the NDK functionality soon.
In the meantime, we will improve the integration with the build tools, and we will start to work on the automated context enrichment so that you can enjoy the rich error context without manual enrichment of your code.
To learn more about the SDK, please check the Android SDK documentation https://docs.sentry.io/platforms/android/, and if you have any questions or feedback or feature request, please let us know https://github.com/getsentry/sentry-android/issues.


